
Getting Started
This chapter walks you through installing Quasar, connecting for the first time, creating your company database, and making the critical early decision of what business features to enable.
How Quasar Stores Data
Before you begin entering data, it helps to understand one key design principle: Quasar stores all records using internal IDs that are generated automatically and never visible to you. Customer names, item numbers, account codes — these are all labels that you see and control, but internally Quasar links everything by its hidden ID.
Installing Quasar
Quasar 7.1 is available as a client-server system. The server (quasard) hosts your company databases and handles all business logic. The client connects to the server over your network.
Windows Installation
The Windows installer bundles the Quasar server, the accounting client, and all required dependencies into a single setup package.
- Run the Quasar installer (
Quasar-7.1.0-x86_64-PostgreSQL.exe). The installer will guide you through accepting the license agreement and choosing an installation directory (default:C:\Program Files\Quasar\7.1.0). - During installation, the server setup scripts are placed in
the
server_setup\folder. These include:- PostgreSQL 16.4 — the database engine
- OpenSSL 3.4 — for encrypted connections
- Visual C++ Redistributable — required runtime
- install_server.bat — registers quasard as a Windows service
- Run
install_server.batas Administrator to install PostgreSQL (if not already present) and register the Quasar server service. - The Quasar server (quasard) will start automatically as a Windows service.
Linux Installation
Quasar 7.1 provides pre-built packages for the following distributions:
| Distribution | Package Format |
|---|---|
| AlmaLinux 9 | RPM |
| AlmaLinux 10 | RPM |
| Debian 12 | DEB |
| Debian 13 | DEB |
| Fedora 42 | RPM |
| openSUSE 15.6 | RPM |
| Ubuntu 24.04 | DEB |
The server requires PostgreSQL to be installed and running.
Available Linux Packages
| Package | Description |
|---|---|
quasar-single | All-in-one install for a single computer (server + client + tools + help) |
quasar-server | Server daemon (quasard) — hosts databases, shared by all clients |
quasar-client | Accounting GUI client |
quasar-tools | Command-line tools: quasar_import, quasar_report, major_update |
quasar-help-en-ca | English (Canada) help files |
quasar-sample-company | Sample company database for testing and training |
quasar-virtual-client | Headless virtual client for automated daily tasks (quasar_clientd) |
quasar-pos-client | Point-of-Sale client (Tcl/Tk) |
Key Dependencies
The package manager will install these automatically, but for reference:
| Component | Required By | Purpose |
|---|---|---|
| PostgreSQL | Server | Database engine |
| Qt 6 (Widgets, Xml, Network, Concurrent, PrintSupport, HttpServer) | Server, Client | GUI framework, networking, and web services |
| ICU (libicu) | Client, Tools | Unicode and internationalization |
| Tcl/Tk 8.6 or 9.0 | Client, POS | POS client runtime, scripting |
| OpenSSL | Server | Encrypted client-server connections |
| libpq | Server | PostgreSQL client library |
| FreeFonts (fonts-freefont-ttf) | POS | Receipt and display fonts |
| SQLite3 | POS | Local POS data caching |
Installation Steps
- Install PostgreSQL using your distribution’s package manager
(e.g.,
apt install postgresqlon Debian/Ubuntu ordnf install postgresql-serveron Fedora/AlmaLinux). - Install the Quasar packages. For a single-computer setup:
apt install quasar-single(DEB) orrpm -i quasar-single(RPM)
For a multi-computer setup, installquasar-serveron your server andquasar-clienton each workstation. - Run the Quasar installation script to configure the database connection and create the initial system tables.
- Start the quasard service:
systemctl start quasard
POS Client (Separate Installer)
The Point-of-Sale client has its own lightweight installer
(Quasar-POS-7.1.0-x86_64.exe) designed for register terminals.
It connects to the same Quasar server as the accounting client.
Connecting for the First Time
When you launch the Quasar client for the first time, the Connect Wizard appears. The wizard walks you through selecting your language, choosing your locale, and connecting to your Quasar server.
Step 1: Select Your Language and Country
The first screen asks you to choose your base language. Quasar supports five languages:
- English
- Français (French)
- Español (Spanish)
- ᚅᚅ (Inuktitut syllabics)
- Filipino
Below the language buttons, select your Locale from the dropdown. The locale determines your country-specific settings — currency format, tax rules, date format, and which regulatory features are available. Available locales include:
- English (Canada)
- Français (Canada)
- Español (México)
- English (Belize)
- Filipino (Philippines)
- Inuktitut (Canada)
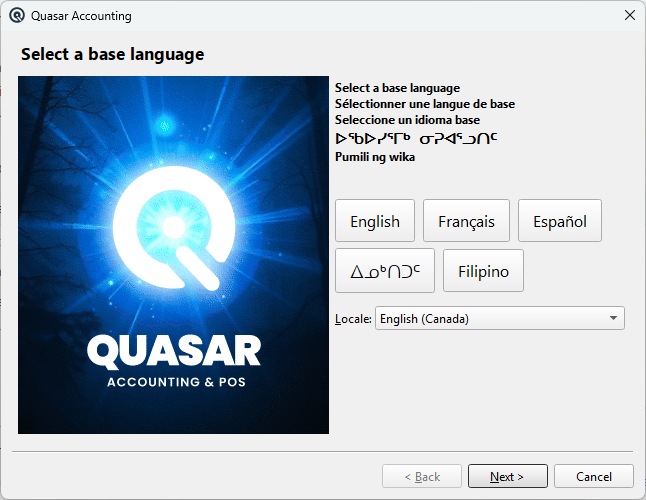
Connect Wizard — Select your base language and locale. This choice determines the UI language and country-specific features throughout Quasar.
Step 2: Connect to Your Server
After selecting your language and locale, the wizard asks you to connect to your Quasar server.
- Enter the server hostname or IP address where quasard is
running. For a local installation, use
localhost. - Enter the port number (default:
3599). - The wizard will test the connection and display the server version and available companies.
Creating a New Company Database
To create a new company:
- From the Connect Wizard, choose Create a New Company.
- Enter a company name and short code (e.g., “My Business” / “MB”). The short code is used internally to identify the database.
- Select a chart of accounts. Quasar provides default charts for different business types, or you can start with a blank chart and build your own (see Chapter 3).
- Choose your fiscal year start date.
- Click Create. Quasar will build the database, load the default chart of accounts, and log you in.
Opening an Existing Company
If a company database already exists on the server:
- Launch the Quasar client and connect to the server.
- The Connect Wizard will display a list of available companies.
- Select your company and enter your username and password (default admin credentials are set during company creation).
- Click Open to log in.
Opening a Sample Company
Quasar includes sample company databases with pre-loaded data for training and testing. These are ideal for exploring Quasar features before setting up your own company. Select a sample company from the Connect Wizard’s company list.
Restoring from a Company Backup
If you have a database backup from a previous Quasar installation, use the Connect Wizard’s Restore option to import it into the server. This creates a new company from the backup file.
Upgrading from a Previous Version
If you are upgrading an existing Quasar installation, the process depends on whether it is a minor update (e.g., 7.1.0 to 7.1.1) or a major update (e.g., 6.1.0 to 7.1.0). Both are managed through Quasar Admin.
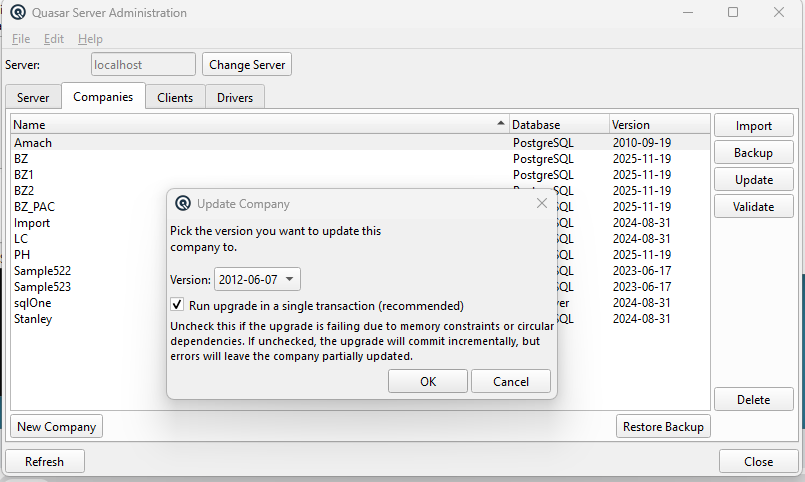
Quasar Admin — company list showing database versions, with the Update Company dialog open. Note the version selector and single-transaction option.
Backing Up Before an Update
- Open Quasar Admin.
- Select the company you want to back up from the company list.
- Click the Backup button.
- Choose a location to save the backup file.
- Repeat for each company database on the server.
Updating a Company Database
Updates are applied version to version. If a company is several versions behind, you update it one version at a time. For example, a company at version 2012-06-07 would be updated to 2024-08-31, then to 2025-11-19, stepping through each data model version in sequence.
- Install the new version of Quasar (see Installation above).
- Open Quasar Admin.
- The company list shows the current data model version for each company.
- Highlight the company that needs updating.
- Click the Update button.
- Select the target version from the version dropdown. Choose the next version in sequence.
- Leave “Run upgrade in a single transaction” checked (recommended). This ensures the update is fully applied or fully rolled back if an error occurs.
- Click OK. Quasar Admin applies the schema changes for that version.
- Repeat for each subsequent version until the company is at the current version.
Restoring a Company from Backup
- In Quasar Admin, click the Restore button.
- Browse to the backup file you saved earlier.
- Quasar Admin will restore the company database to its pre-update state.
Windows Upgrade
On Windows, run the new installer. It will replace the Quasar binaries.
Then run install_server.bat to re-register the service with the
updated executable. Your company databases and configuration are preserved.
Use Quasar Admin to update each company as described above.
Deciding What Quasar Will Do: Business Feature Settings
Before configuring anything else, you need to decide which business features to enable. This is one of the most important early decisions because feature flags control which screens, fields, and menu items are visible throughout Quasar.
Access this from Setup → System → Business Features, or see the full reference at Business Features.
What Feature Settings Control
Each feature toggle enables or disables an entire module:
| Feature | What It Enables |
|---|---|
| Inventory | Item master, departments, stock tracking, adjustments |
| Purchasing | Purchase orders, vendor invoices, receiving, claims |
| Consignments | Consignment in/out and returns |
| Serial Numbers | Serial tracking on items through purchase and sale |
| Build Kits | Kit items, item build, component assembly |
| Loyalty Program | Points earning, redemption, loyalty rates |
| Jobs | Job costing and tracking |
| Assets | Fixed asset tracking and depreciation |
| E-Invoicing | Electronic invoicing and PAC certification |
Recommended Feature Profiles
| Business Type | Recommended Features |
|---|---|
| Retail Store | Inventory, Purchasing, Loyalty, Serial Numbers |
| Wholesale / Distribution | Inventory, Purchasing, Consignments, Build Kits |
| Fuel Site | Inventory, Purchasing, Build Kits (fuel derivatives), Assets |
| Service Business | Jobs, Assets (minimal inventory) |
The Main Window
After logging in, the Quasar main window provides access to all modules through the menu bar and optional toolbar buttons. The menu structure adapts based on your enabled business features — only relevant options appear.
For a detailed tour of navigation, keyboard shortcuts, and screen conventions, see Chapter 2: Navigating Quasar.