
Navigating Quasar
This chapter explains the Quasar client interface — menus, toolbars, screen conventions, and keyboard shortcuts — so you can move through the application efficiently.
The Main Window
After logging in, the main window is your home base. It consists of:
- Menu Bar — access to every function, organized by module
- Toolbar — quick-access buttons for frequently used screens (customizable)
- Status Bar — displays the current company, store, station, and logged-in user
The Menu Bar
Quasar has three menus across the top of the main window:
| Menu | What It Contains |
|---|---|
| File | Change Company, Configuration, Server Admin, Business Features, Change Password, Exit |
| Setup | All setup and configuration screens, organized into submenus:
|
| Help | Help (F1), About Quasar, About Qt |
The Toolbar
Below the menu bar is a row of quick-access toolbar buttons for the most frequently used transaction screens. These provide one-click access to create new transactions without navigating through menus:
| Button | Opens |
|---|---|
| Journal Entry | New general journal entry |
| Write Cheque | New quick cheque |
| Customer Quote | New customer quotation |
| Customer Order | New sales order |
| Customer Invoice | New customer invoice |
| Customer Payment | New customer payment (receipt) |
| Purchase Order | New purchase order |
| Vendor Invoice | New vendor invoice (receiving) |
| Vendor Payment | New vendor payment (cheque) |
The Calculator button is also available on the toolbar for quick calculations without leaving the application. See Calculator.
Panels (Module Workspaces)
The main area of the Quasar window displays panels — card-style workspaces organized by business function. Each panel contains action buttons and report links arranged in a visual grid. Click the panel tabs to switch between modules:
| Panel | Contains |
|---|---|
| Card File | Mailing Labels, Send E-Mail, Card Adjustments, Task Management, Job Control, Transaction Journal, Card Transfer, Employees report |
| Ledger | Chart of Accounts, Asset Management, Journal Entry, Transaction Journal, Ledger Transfer; reports: Balance Sheet, Profit & Loss, Trial Balance |
| Cheques | Write Cheque, Reconcile, Print Cheques, Customer Cheque, Transaction Journal; report: Cheque List |
| Inventory | Promotion Batch, Item List, Price Batch, Label Batch, Stock Status, Item Adjustments, Item Transfer, Count Master, Auto Order; reports: Item History, Sales History, Price Changes, On Order |
| Sales | Customer List, Invoice List, Customer Return, Customer Payment, Find Transactions, Inquiry, Tender Reconcile, Pay Bills; reports: Customer Sales, Aged Receivables, Detailed Statement, Print Statements, Service Charges, Transaction Summary |
| Purchases | Purchase Orders, Vendor Invoices, Vendor Claims, Vendor Payment, Pay Bills, Transaction Journal; reports: Vendor List, Aged Payables, Vendor Purchases, On Order, Auto Order |
| Consignments | Consignments (In) List, Consignment (In) Returns, Consignments (Out) List, Consignment (Out) Returns; report: Consignment Status |
Each panel also includes report links along the left side, providing direct access to relevant reports for that module.
Shortcut Buttons
At the bottom of the main window, four shortcut buttons provide quick access to cross-module tools:
| Shortcut | Opens |
|---|---|
| Reports | Full Report List |
| Find | Find Transactions |
| Inquiry | Account Inquiry |
| Summary | Transaction Summary |
Screen Conventions
Quasar uses a consistent set of screen types throughout the application. Once you learn these patterns, every module works the same way.
List Screens
List screens display records in a sortable, filterable table. You’ll find a list screen for every data type (accounts, items, customers, vendors, invoices, etc.).
- Search / Filter — type in the filter fields at the top to narrow the list
- Column sorting — click any column header to sort ascending; click again to reverse
- Open a record — double-click a row to open it in the Master screen
- New record — click New (or press Ctrl+N) to create a new record
Master Screens (Detail Screens)
Master screens are where you create and edit individual records. Most master screens use tabs to organize related fields into logical groups (e.g., the Item Master has General, Stocking, Costs, Prices, Extra Info, Images, Web Info, Kit, Modify, and Links tabs).
For complete field-by-field documentation of any master screen, click the Help button or press F1 to open the context-sensitive help reference.
Standard Buttons
| Button | Action |
|---|---|
| OK | Save the record and close the screen |
| Next | Save the record and open a blank form for a new entry |
| Copy | Clone the current record into a new, unsaved copy with all fields preserved but the ID and number cleared |
| Cancel | Discard changes and close |
| Delete | Delete the current record (if permitted by security) |
| Print the current record or report | |
| Help | Open context-sensitive help for this screen (F1) |
Cloning Records
The Copy button is a powerful productivity tool that works on virtually every screen in Quasar. When you click Copy, the current record is cloned into a new, unsaved copy. The clone keeps all of the data from the original — customer, items, accounts, amounts — but clears the transaction number, reference, and ID so it becomes a brand new record.
Cloning is available on:
- Transaction screens — invoices, cheques, receipts, purchase orders, vendor invoices, journal entries, item adjustments, item transfers, payouts, and more
- Master screens — items, customers, vendors, stores, stations, tenders, discounts, and other setup records
- Batch screens — price batches, promotion batches, label batches
Example: You need to create several similar invoices for the same customer with different items. Enter the first invoice, save it, then click Copy — the customer, terms, and other header fields carry forward into a new unsaved invoice. Change only the items and save. Open the new invoice and click Copy again to continue.
Inline Calculator
In any monetary field (price, amount, cost, etc.), pressing the + or * key opens the built-in calculator pre-loaded with the current value of that field. When you close the calculator, the result is saved back into the field automatically.
Example: A supplier offers you 10% off an item that costs $50.00. With your cursor in the cost field:
- Press * — the calculator opens showing 50.00
- Type .9
- Press = — the calculator shows 45.00
- Close the calculator — the field now contains 45.00
Lookup Fields
Many fields throughout Quasar use lookup edits — intelligent fields that connect directly to the database. Lookups are used for customers, items, accounts, vendors, employees, and most other data types. They all share the same interaction pattern:
| Action | What Happens |
|---|---|
| Start typing | A dropdown appears with matching records as you type |
| Tab | Accept the top match and move to the next field |
| Right-click | Opens a context menu with a Lookup List option that opens the full list screen for that data type |
| F12 | Opens the corresponding list screen directly. If you have typed any text in the field, the list opens pre-filtered to show only matching records |
Advanced Lookups: Customers, Items, and Accounts
Three lookups have an enhanced fuzzy search that searches across multiple fields simultaneously. You can find a record by typing any fragment of any identifying field:
| Lookup | Fields Searched |
|---|---|
| Customer | Customer name, company name, street address, city, phone number, customer number, email |
| Item | Item description, item number, UPC/EAN code, vendor item number, PLU number |
| Account | Account name, account number |
Example: On an invoice, you need to look up a customer but can only remember the last four digits of their phone number. Type those four digits into the Customer field and press F12. The Customer List opens showing only customers whose records contain those digits — in any field.
Keyboard Shortcuts
Quasar supports standard keyboard shortcuts for efficient navigation:
General Shortcuts
| Shortcut | Action |
|---|---|
| F1 | Open help for the current screen |
| F12 | Open the lookup list for the current field (pre-filtered if text entered) |
| + or * | In any monetary field, open the calculator with the field’s current value |
| Ctrl+N | New record |
| Ctrl+S | Save (same as OK) |
| Ctrl+P | |
| Tab / Shift+Tab | Move between fields |
| Enter | Activate button / confirm selection |
| Escape | Cancel / close dialog |
| Alt+Down | Open a dropdown list |
Tab Navigation Shortcuts
| Shortcut | Action |
|---|---|
| Ctrl+K | Focus the Navigation Sidebar search field |
| Ctrl+W | Close the current tab |
| Ctrl+Tab | Switch to the next tab |
| Ctrl+Shift+Tab | Switch to the previous tab |
| Ctrl+1 … Ctrl+9 | Jump directly to tab ① through ⑨ (tabs show circled number indicators) |
| Ctrl+0 | Open the tab list dropdown menu (shows all open tabs) |
| Ctrl+/ | Split & detach the current tab into a separate window |
| Ctrl+Click | Open in Pane 2 (works from sidebar, list screens, and any screen) |
| Ctrl+Enter | Same as Ctrl+Click — open in Pane 2 (works from sidebar and list screens) |
| Ctrl+Shift+Click | Open in a detached floating window (works from sidebar, list screens, and any screen) |
| Ctrl+Shift+Enter | Same as Ctrl+Shift+Click — open in a detached floating window |
| Middle-click | Close a tab (same as clicking the × button) |
Tabbed Single-Window Mode
Quasar uses a modern tabbed interface where every screen — lists, master records, transactions, reports — opens as a tab within a single application window. This replaces the older floating-window model used in previous versions.
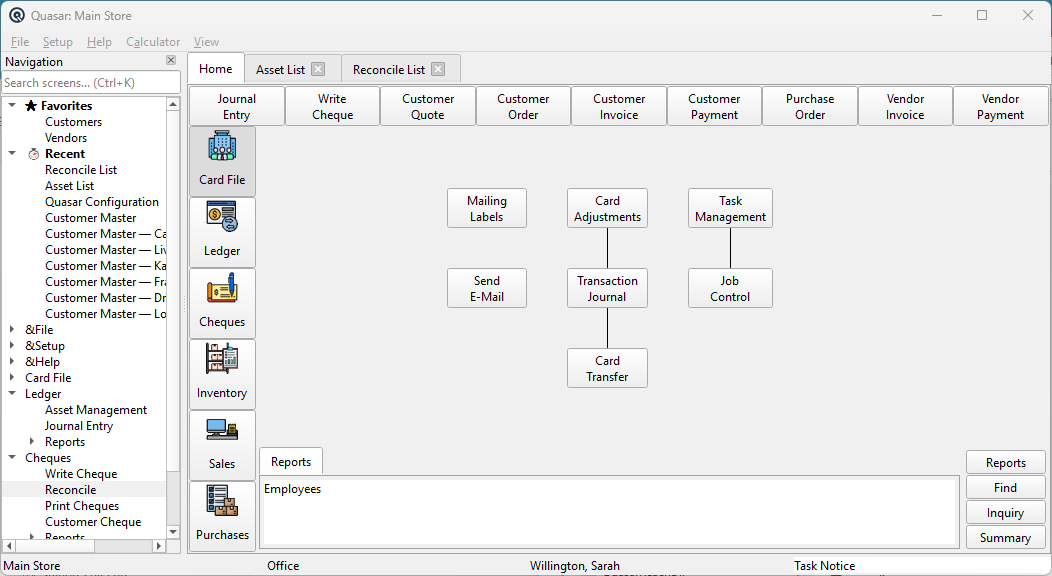
The tabbed layout keeps your desktop organized and makes switching between screens fast. Instead of hunting through overlapping windows, you simply click a tab — or use a keyboard shortcut — to bring any open screen to the front. Tabs remember their scroll position and unsaved edits, so your work is preserved as you move between them. For field-by-field reference, see Main Window.
The Navigation Sidebar
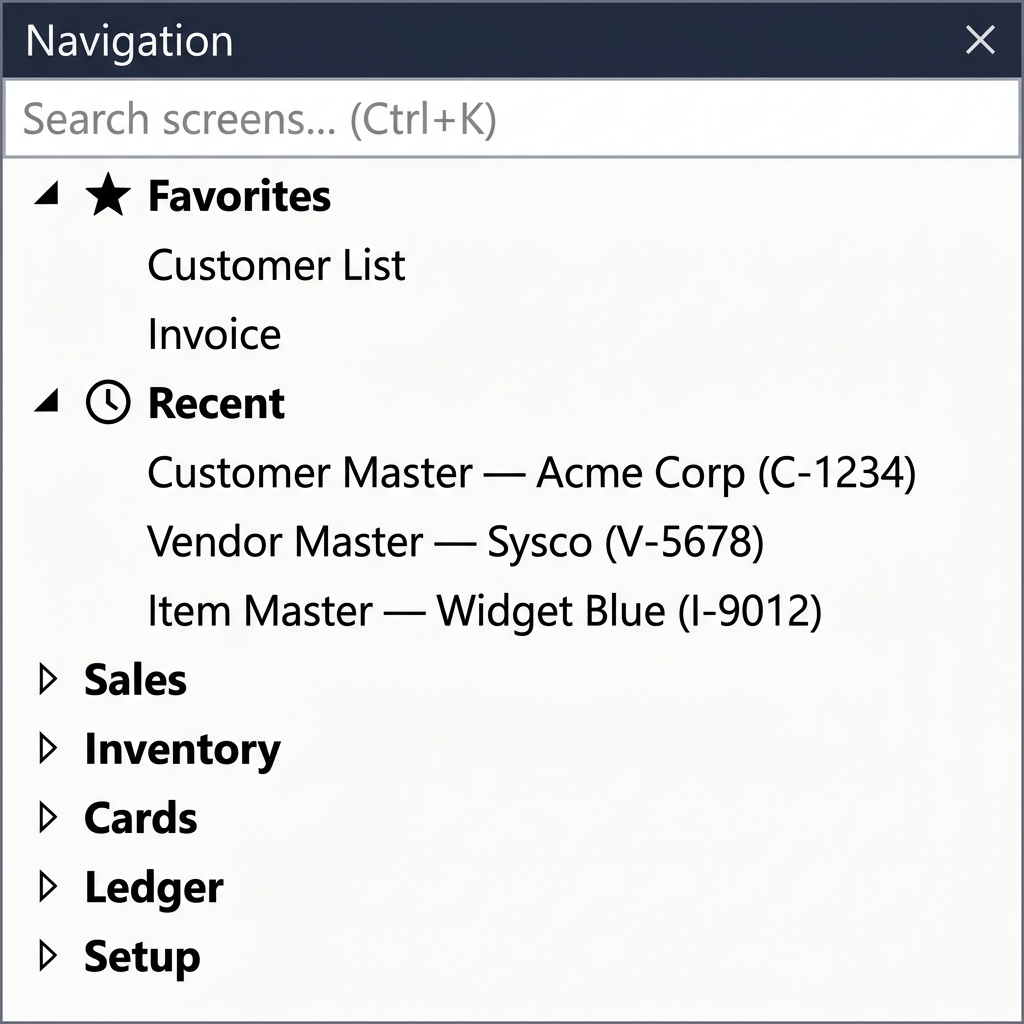
On the left edge of the main window, the Navigation Sidebar provides a persistent, organized gateway to every screen in the application. The sidebar is always visible, regardless of which tab is active.
Search
At the top of the sidebar is a search field. Type any part of a screen name to instantly filter the navigation list. Results update as you type, so you can jump to any screen in a few keystrokes. Press Ctrl+K from anywhere in the application to focus the sidebar search field without reaching for the mouse.
Favourites
Below the search field is a Favourites section. To add a screen to your favourites, right-click any navigation link and choose Add to Favourites. To remove a favourite, right-click it and choose Remove from Favourites. Favourites are saved per user and persist across sessions, so your most-used screens are always one click away.
Recently Viewed
The Recently Viewed section displays the last 10 screens you opened. Each entry shows the screen name along with the record name when applicable (e.g., “Customer Master — Acme Corp”). This list persists across sessions, making it easy to return to records you were working with yesterday.
Categories
The lower portion of the sidebar organizes all screens into categories that mirror the application’s module structure:
- Sales — customer lists, invoices, payments, quotes, orders, returns
- Inventory — item lists, stock status, adjustments, transfers, counts, promotions
- Purchases — vendor lists, purchase orders, vendor invoices, vendor payments
- Ledger — chart of accounts, journal entries, reconciliation, asset management
- Card File — contacts, employees, mailing labels, CRM tasks
- Reports — all available reports grouped by module
- Setup — system configuration, security, taxes, and other administration screens
Click a category heading to expand or collapse it. Use Ctrl+Enter (or Ctrl+Click) on any link to open the screen in the second pane of a split view (see Split View below).
Working with Tabs
Every screen you open appears as a tab along the top of the content area. Tabs provide visual context and convenient management controls.
Tab Titles
Each tab displays a descriptive title that includes the screen name and, when a specific record is open, identifying information. For example:
- Customer Master — Acme Corp (C-1234)
- Invoice #10042 — Baker Electronics
- Stock Status (list screens show only the screen name)
This makes it easy to tell at a glance which record each tab contains, even when you have many tabs open.
Closing Tabs
You can close a tab in several ways:
- Click the × button on the tab
- Middle-click (mouse wheel click) anywhere on the tab
- Use the View menu › Close All Tabs to close every tab in the window
- Use the View menu › Close Pane Tabs to close only the tabs in the currently active pane (useful in split view)
Tab Context Menu
Right-click any tab to access its context menu:
| Command | Action |
|---|---|
| Close | Close this tab |
| Close Others | Close all tabs except this one |
| Close All | Close every tab in the current pane |
| Split Right | Keep this tab in Pane 1; move tabs after it to Pane 2 (only shown when tabs exist to the right) |
| Split Left | Keep this tab in Pane 1; move tabs before it to Pane 2 (only shown when tabs exist to the left, excluding Home) |
| Split & Detach Pane | Create a split and immediately detach Pane 2 into a separate window (see Detached Window below) |
| Detach to Window | Remove this individual screen from the tab bar and open it as a standalone floating window with its own menu bar |
Unsaved Changes
If you attempt to close a tab that contains unsaved changes, Quasar will always prompt you before discarding your work. You will see a dialog offering three choices: Save, Discard, or Cancel. This protection applies whether you close a single tab, close all tabs, or quit the application.
Split View
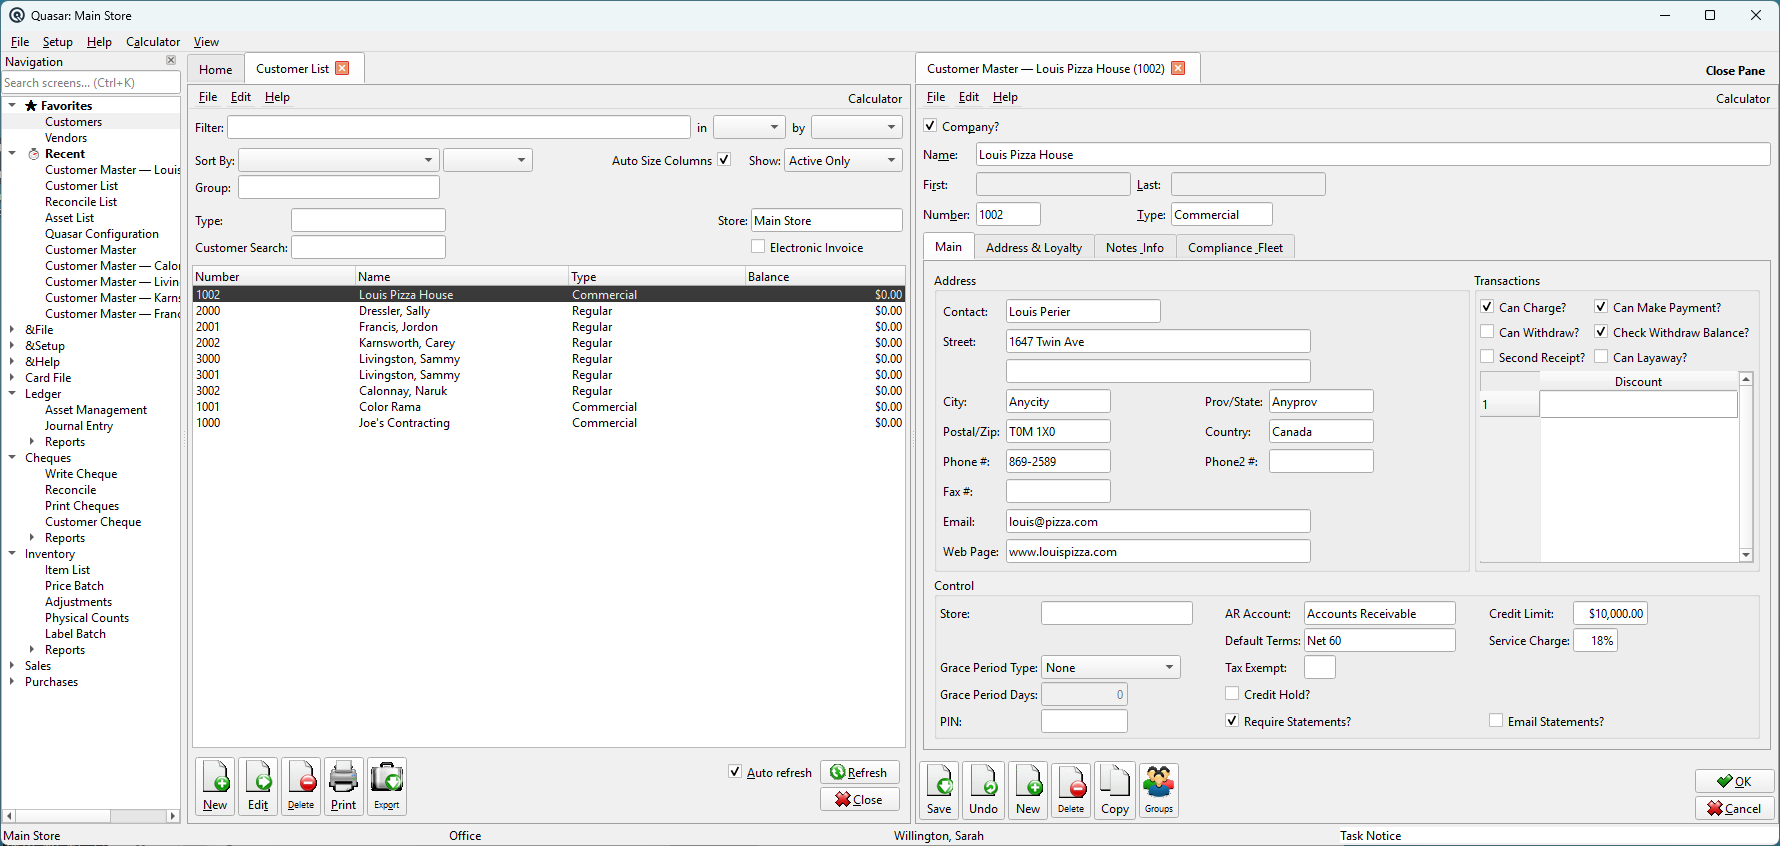
Split view divides the content area into two panes, each with its own set of tabs. This lets you view two screens side by side — for example, a list on the left and a detail record on the right.
Creating a Split
To set up a split view:
- Open at least two screens as tabs (e.g., a Customer List and a Vendor List).
- Right-click the tab you want to keep in Pane 1 and choose Split Right (to move tabs after it to Pane 2) or Split Left (to move tabs before it to Pane 2). The content area divides into two side-by-side panes.
- Click any link in the Navigation Sidebar to open a screen in Pane 1, or use Ctrl+Enter (or Ctrl+Click) to open it in Pane 2.
Routing Logic
When a split view is active, Quasar uses intelligent routing to decide which pane receives new tabs:
| Action | Opens In |
|---|---|
| Click a Navigation Sidebar link | Pane 1 (primary) |
| Ctrl+Enter or Ctrl+Click a Navigation Sidebar link | Pane 2 (secondary) |
| Double-click a row in a list screen | Pane 2 (secondary), so the list stays visible in Pane 1 |
| Click New from a list screen | Pane 2 (secondary) |
This routing keeps your list or reference screen visible in one pane while detail records open in the other, creating an efficient browse-and-edit workflow.
Moving Tabs Between Panes
You can drag and drop any tab from one pane to the other. Simply click and hold the tab, then drag it to the tab bar of the opposite pane and release. This lets you reorganize your workspace at any time.
Closing a Split Pane
To close the second pane, close all of its tabs, or use the View menu › Close Pane Tabs. When the last tab in a pane is closed, Quasar displays a dialog with three options:
- Move to Main — transfer all remaining tabs from the closing pane into the main pane before removing the split
- Close All — close all tabs in the pane and remove the split
- Cancel — keep the split open
Detached Window (Dual Monitor)
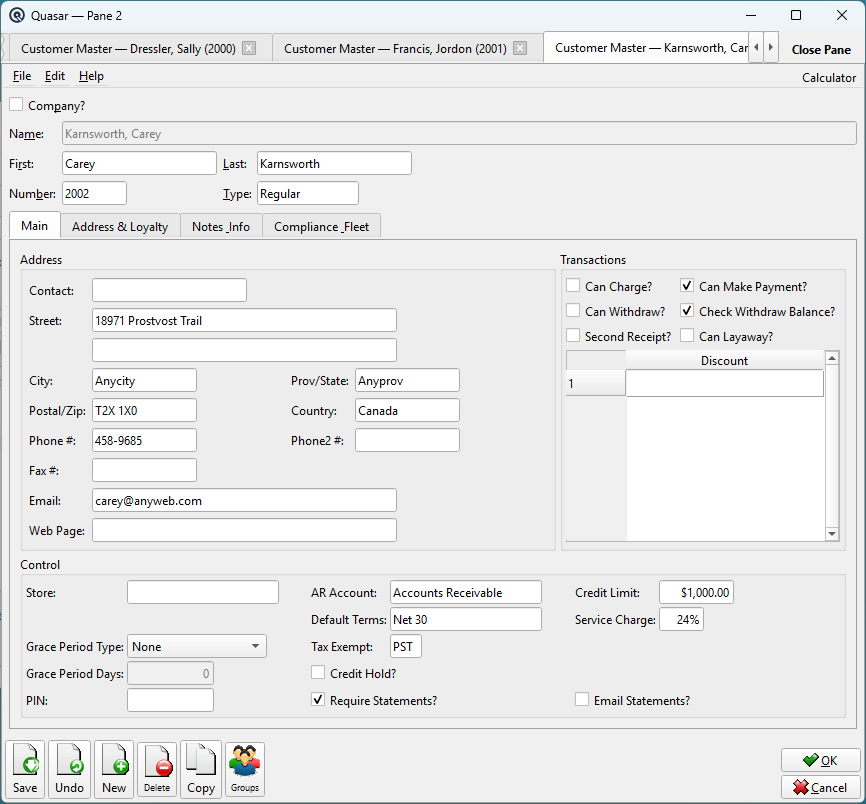
For users with two or more monitors, Quasar can detach a tab or an entire split pane into a separate window. This lets you spread your workspace across screens — for example, keeping a report on one monitor while entering transactions on the other.
Detaching an Individual Screen
Right-click any tab and choose Detach to Window. The screen is removed from the tab bar and opens as a standalone floating window with its own menu bar. A Return to Tab Bar action appears in the menu bar, which you can click at any time to re-embed the screen back into the tab bar.
Detaching a Tab as a Split Pane
Right-click any tab and choose Split & Detach Pane. This creates a split view and immediately detaches Pane 2 into a separate window. You can move this window to a second monitor, resize it, and continue working with it exactly as you would in the main window. All subsequent list double-clicks and Ctrl+Enter navigations route to this detached window automatically.
Detaching and Reattaching a Split Pane
If you already have a split view, you can detach an entire pane into a separate window. Right-click the pane’s tab bar and choose Detach Pane. All tabs in that pane transfer to the new window. To reattach, close the detached window — Quasar will display the same Move to Main / Close All / Cancel dialog described above.
Automatic Routing
Routing logic continues to work automatically when a detached window is open. Double-clicking a row in a list screen in the main window will still open the detail record in the secondary pane — even if that pane is now in a detached window on another monitor.
Closing a Detached Window
When you close a detached window, Quasar presents three options:
- Move to Main — transfer all tabs back to the main window
- Close All — close all tabs in the detached window
- Cancel — keep the detached window open
As always, any tab with unsaved changes will prompt you before it is closed.
Personalizing Your Display
Use File → Configuration to adjust your personal display preferences. These settings affect only your workstation.
See the full reference at Quasar Configuration. For a complete reference of the tabbed interface, see Main Window.
| Setting | What It Controls |
|---|---|
| Locale | Date format, number format, currency symbol |
| Default Store | Which store you see data for by default |
| Default Station | Your POS station assignment |
| Default Employee | Automatically fills employee fields |
Context-Sensitive Help
Every screen in Quasar has a corresponding help page. Press F1 at any time to open help for the screen you are currently viewing. The help page describes each field, tab, and button on that screen.
The full help reference is organized by module and can be browsed from the Help Table of Contents.