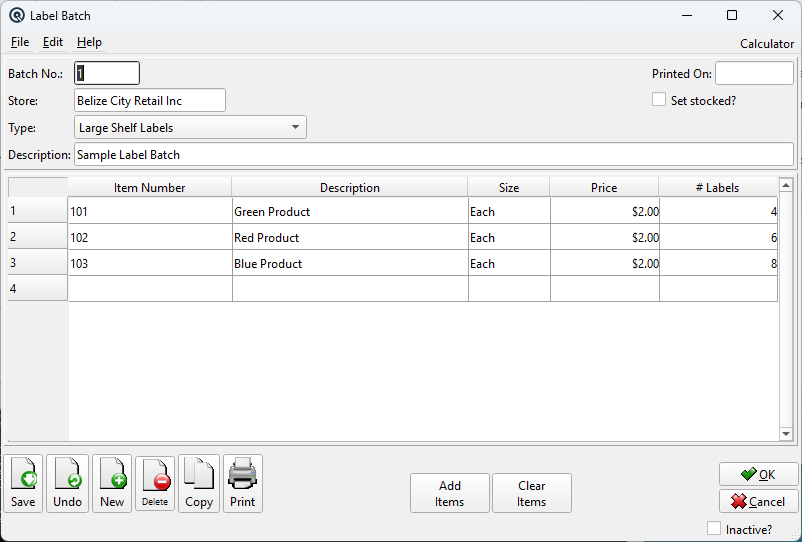
The Label Batch Master creates and prints shelf and price labels for inventory items. Labels are generated from configurable templates and can include item number, description, price, department, vendor, location, price-by-volume, and custom extra fields. Items can be added individually or in bulk by department, subdepartment, or vendor. Access from Inventory › Label Batch or from the Label Batch List.
Header Fields
Batch No.
Auto-generated batch number (up to 10 digits). Used to track and reprint label batches.
Store
The store for which labels are being printed. Determines price zone, on-hand quantities, and stocking status. Changing the store clears all items from the table (prices and stock differ by store).
Type
The label template to use for printing. Populated from the server's shelf_labels resource directory. Each template defines the physical label layout — dimensions, rows, columns, margins, gaps, orientation (portrait or landscape), and which data fields appear on each label. A type must be selected before printing.
Description
Free-text description for this batch (e.g., "Weekly price change — May 3" or "New arrivals — Aisle 7").
Printed On
Read-only date stamp. Set automatically when labels are successfully printed and confirmed. Allows you to track when labels were last generated.
Set Stocked?
Checkbox. When enabled, adding an item that is not currently stocked at the selected store will automatically:
• Set the item to stocked with default min/max quantities (1/2).
• Create a Regular price if none exists (calculated from cost + target gross margin from the subdepartment, with tax and deposit inclusion rules applied).
• Round the price using the store's Price Zone rounding rules.
This is useful when receiving new items from a vendor and needing labels before the items are formally set up in the store.
Inactive?
Status bar checkbox. When checked, the batch is marked inactive and will not appear in default lists.
Items Table
Items Table
The items table lists every item that will have labels printed. Columns:
Item Number — Scan or type an item number. Validated on entry: the item must be sold, must have a label type other than "None", and must have prices configured for the store's price zone. Description — Auto-filled from the item master (read-only). Size — Editable dropdown of the item's selling sizes. Changing the size automatically updates the Price column to the regular price for that size in the store's price zone. Price — The regular selling price. Auto-populated but editable — you can override the price for this label run without affecting the item master. # Labels — The number of labels to print for this item. Defaults depend on the item's label type setting (from the Item Master):
Label Type
Default # Labels
Shelf Labels
1 (one shelf tag)
Item Labels
Current on-hand quantity (one label per unit in stock)
None
Item is rejected from the batch
Label Data Fields
Each label template can reference the following data fields. Which fields appear depends on the template design:
• number — Item number
• description — Item description
• price — Selling price (formatted as currency)
• size — Unit size name
• dept / deptNum — Department name and number
• subdept / subdeptNum — Subdepartment name and number
• vendor_name / vendor_number — Default vendor
• order_number / order_qty — Vendor order number and purchase quantity
• location — Store location/aisle
• date — Current print date
• pbv — Price-by-volume unit description
• pbv_price — Price per volume unit (price ÷ volume)
• extra:<name> — Any Extra Info field defined on the item
Printing
Clicking Print initiates the label printing workflow:
1. Confirmation — "Are you sure you want to print the labels?" 2. Starting Position — A dialog asks for the Starting Row and Starting Column on the label sheet. This lets you resume printing on a partially-used sheet. 3. Printer Selection — Standard system print dialog. 4. Paper Size Validation — The selected printer's paper size is validated against the label template's defined page size. If they don't match, an error is shown. 5. Rendering — Labels are rendered in a grid pattern across pages, advancing row-by-row, column-by-column. Each item's # Labels count determines how many consecutive labels are printed before moving to the next item. 6. Confirmation — "Were the labels printed properly?" Answering Yes stamps the Printed On date and saves the batch.
Action Buttons
Add Items
Opens a bulk item selection dialog. Filters items by department, subdepartment, vendor, or other criteria and adds all matching items to the batch at once. Items with label type "None" are automatically excluded. The count for each item follows the same Shelf/Item label type rules described above.
Clear Items
Removes all items from the batch after a confirmation prompt. The batch header (number, store, type, description) is preserved.
Print
Prints the labels using the selected template. See the Printing section above for the full workflow.
Validation Rules
• Items must be flagged as Sold on the Item Master.
• Items must have a label type of Shelf Labels or Item Labels (not "None").
• Items must have at least one price configured for the store's price zone.
• A store must be selected before adding items or printing.
• A label type (template) must be selected before printing.
• The printer's paper size must match the label template's page size definition.