
Inventory
Matrix Build
Matrix Build is a bulk item creation tool that generates multiple inventory items from a single matrix definition. You define a base item profile (name, department, cost, price) and then specify a set of sizes and colors. Quasar creates one item for every size/color combination, automatically assigning item numbers, linking all items to the same matrix group, and setting up cost, price, and store stocking records. This is essential for apparel, footwear, and similar product lines where many SKUs share common attributes but vary by size and color. Access from Inventory › Matrix Build.
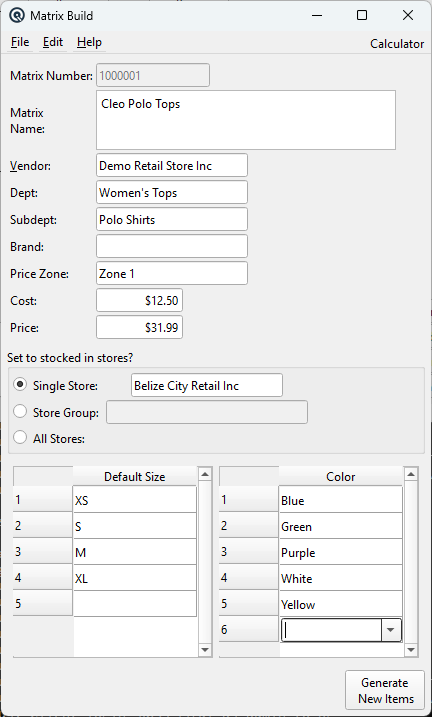
Item Definition
Matrix NumberAuto-assigned item number pulled from the global sequence counter. This is the starting number for the batch — each generated item increments from here. Read-only; Quasar automatically skips numbers already in use. Matrix NameRequired. The base description for all items in the matrix. Each generated item's description is formed as: Matrix Name + Size + Color (e.g. "T-Shirt LG Red"). Enter a multi-line name if needed. This name is also stored as the Matrix record name for grouping. VendorThe default purchasing vendor for all generated items. This vendor is linked to every cost record created. Leave blank if items are not purchased from a single vendor. Only visible when the Purchasing feature is enabled. DeptThe department for the generated items. Selecting a department filters the Subdept lookup to only show subdepartments within that department. If you select a Subdept first, the Dept is automatically populated from the subdepartment's parent. SubdeptRequired. The subdepartment that governs the generated items' accounting, tax, pricing, and size defaults. When you select a subdepartment:
BrandOptional brand assignment for all generated items. Only visible when the Brand feature is enabled. Price ZoneRequired. The price zone used for pricing and tax configuration. The zone determines which subdepartment sell tax, purchase tax, target gross margin, and variance settings apply. Items are only stocked in stores that belong to this zone. CostThe default purchase cost for all generated items. Applied to every cost record created for each item/store combination. Leave at zero for items with no standard cost. PriceRequired. The selling price for all generated items. Applied to the item price record using the selected Price Zone. Tax inclusion is determined by the subdepartment's zone settings. |
Store Stocking
Single StoreStock the generated items in one specific store only. StoreWhen Single Store is selected, choose the store that will receive the generated items. Store GroupStock the generated items in all stores belonging to a specific group. Store Group LookupWhen Store Group is selected, choose the store group that will receive the generated items. All StoresStock the generated items in every active store in the system. This is the default. Only stores whose zone matches the selected Price Zone will receive stocking records. |
Size Selection
Size TableLists every size that will be used in the matrix. Add one size per row; a new blank row appears automatically as you fill in each size. Default SizeSelect or type sizes for the matrix. The dropdown is pre-populated with the subdepartment's default sizes (e.g. SM, MD, LG, XL). You can select existing sizes or type new ones directly. New sizes you enter that do not already exist in the subdepartment are automatically added to the subdepartment's default size list when you generate. This means future Matrix Builds using the same subdepartment will include your new sizes. Each size must be unique within the build and limited to 8 characters maximum. The size value becomes both the item's sell size and purchase size, and is used in the item PLU (number) record. Add multiple sizes by entering one per row. A new blank row appears automatically as you fill in each size. |
Color Selection
Color TableLists every color that will be used in the matrix. Add one color per row; a new blank row appears automatically as you fill in each color. ColorSelect or type colors for the matrix. The dropdown is pre-populated with all active colors from the Color Master. New colors you type that do not exist in the Color Master are automatically created as new Color records when you generate. This keeps the Color Master up to date — you do not need to pre-create colors before building a matrix. Each color must be unique within the build. Duplicate entries are rejected with a warning. Add multiple colors by entering one per row. A new blank row appears automatically. |
Generation
Generate New ItemsCreates all items after validating required fields. Before generating, Quasar displays a confirmation summary showing:
For example, selecting 4 sizes and 3 colors generates 12 items. Each item receives: • An auto-assigned sequential item number A message log displays each created item for confirmation. The screen closes automatically when complete. |
Related Screens
| Matrix Master | Item Master | Subdept Master | Color Master |
| Quasar Accounting 7.1 • © Linux Canada Inc. • Table of Contents |