
Inventory
Location Master
The Location Master defines physical storage positions within a store. Locations use a three-part addressing system — Section, Fixture, Bin — that maps directly to how inventory is physically organized on the floor. Each item can be assigned a location per store on the Item Master Stocking tab, making locations essential for efficient inventory counts, label printing, and stock replenishment. Access from Inventory › Location Master or from the Location List.
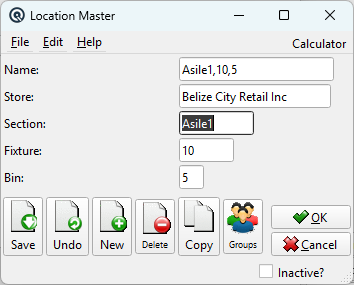
How the Name Is Built
|
The Name field is read-only and is automatically generated from the three editable components: Section, Fixture, and Bin. As you type in any of these fields, the Name updates in real time using the format: Section,Fixture,Bin Components are joined by commas. Empty components are omitted. For example:
This naming convention creates a consistent, sortable address that reads from broadest area (Section) to most specific position (Bin). It is the same name that appears on shelf labels, inventory count sheets, and stock status reports. |
Fields
NameRead-only. Auto-generated from Section, Fixture, and Bin (see above). This is the canonical location identifier used throughout the system. StoreThe store this location belongs to. Each store has its own set of locations. Defaults to the current store. SectionThe broadest physical area (up to 14 characters). Represents a major zone of the store. Examples: Aisle 3, Warehouse, Back Room, Cooler, Pharmacy, Receiving. FixtureA specific fixture or structure within the section (up to 10 characters). Examples: Shelf B, Rack 12, End Cap, Bay 2, Gondola 5, Peg Board. BinThe most specific position within the fixture (up to 4 characters). Examples: 01, L3, Top, A2. Useful for high-density storage like warehouses or parts rooms. InactiveCheck to mark this location as inactive. Inactive locations no longer appear in lookups and cannot be assigned to items, but historical records that reference them remain unchanged. |
Where Locations Are Used
|
Once locations are defined, they are referenced throughout the inventory system: Item Master — Stocking TabEach item can be assigned a location per store. This records exactly where the item lives on the sales floor or in the warehouse. The location is stored as part of the item's stocking record. Inventory CountsLocations are one of the most valuable tools for physical inventory. By assigning locations to items, count teams can: • Work by location — Count sheets and Count Master records can be filtered and sorted by location, so counters walk the store in a logical path (Aisle 1 → Aisle 2 → Back Room) instead of hunting for random items. Shelf LabelsThe Label Batch printing system includes the item's location as a printable field ( Stock Status & ReportsThe Stock Status screen and various inventory reports can include location data, helping managers identify where products are stored without walking the floor. Handheld DevicesWhen using handheld scanners for counts or receiving, the location helps operators navigate to the correct shelf position for each item. |
Naming Best Practices
|
• Be consistent — Use the same naming convention across all stores (e.g., always "Aisle 3" not sometimes "A3" and sometimes "Aisle Three"). |
Related Screens
| Location List | Item Master | Count Master | Label Batch |
| Quasar Accounting 7.1 • © Linux Canada Inc. • Table of Contents |