
Purchases
Slip Master
The Packing Slip Master records goods received from a vendor before the vendor invoice has arrived. This is a common scenario in retail and wholesale — a delivery truck arrives with merchandise and a packing slip, but the formal invoice follows by mail or email days later. The slip captures what was physically received (items, quantities, shipping details) so inventory is updated immediately. When the invoice arrives, the slip is posted, which automatically creates or updates a Vendor Invoice with the correct items and costs. Access from Purchasing › Slip List.
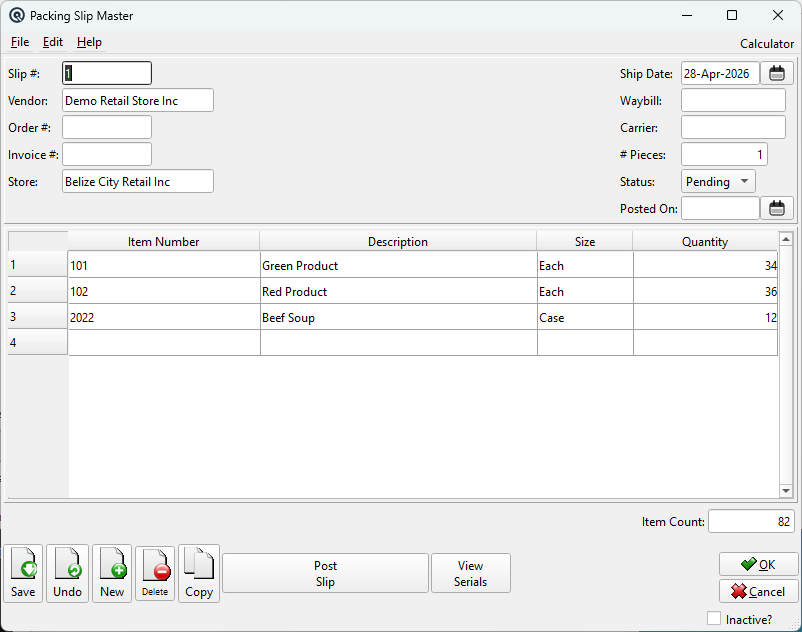
Header Fields
Slip #Auto-assigned slip number (up to 14 characters). Automatically numbered with "#" on creation. Sequence numbering is global (shared across all stores). VendorThe vendor who shipped the goods. The vendor determines which items can be added (only items with purchase costs from this vendor are accepted) and the cost used when posting to a vendor invoice. Order #Optional. The purchase order number(s) this shipment relates to. Multiple order numbers can be entered separated by commas. When the slip is posted, the system uses order costs to price items on the generated vendor invoice if available. Invoice #Optional. The vendor's invoice number, if known at the time of receiving. If provided, posting will search for an existing vendor invoice with this number and add the slip's items to it. If left blank, a new vendor invoice is created on post and this field is auto-filled with the generated invoice number. StoreThe receiving store location. Items must be stocked in this store to be added to the slip. Changing the store after adding items will remove any items not stocked in the new store (with a warning for each item removed). NumberTransaction number. Auto-generated by default; enter # for next sequence number. ReferenceReference string for cross-referencing or notes (optional). StatusTransaction status. Controls posting and visibility in lists. DatePosting date for the transaction. Defaults to today. TimeTime of posting. Auto-filled from the system clock. Work DateWork date for the transaction (may differ from posting date). ShiftShift assignment for labour or shift-based reporting. StationWorkstation or terminal where the transaction was entered. EmployeeEmployee who created or is responsible for the transaction. MemoFree-form memo or notes attached to the transaction. |
Shipping Fields
Ship DateThe date the goods were shipped or received. Defaults to today. WaybillThe carrier's waybill or bill of lading number (up to 20 characters). Useful for tracking shipments and resolving freight claims. CarrierThe shipping carrier name (up to 20 characters), e.g., "FedEx", "Purolator", "LBC Express". # PiecesThe number of cartons, boxes, or pallets received. Defaults to 1. Useful for verifying the shipment is complete against the carrier's manifest. |
Status & Posting
StatusThe slip progresses through three statuses:
You cannot manually set a slip to "Posted" — the only way to reach Posted status is via the Post Slip button. Once posted, the status cannot be changed back. Posted OnRead-only. Shows the date the slip was posted. Blank until posting. |
Items Table
|
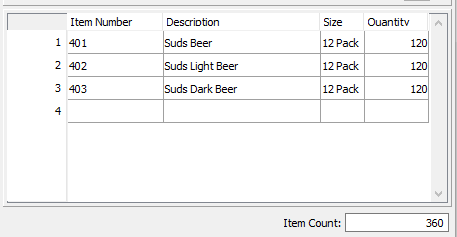
The items table lists every product received in this shipment. Columns: Item Number — Scan or type the item number. Only purchasable, stocked, non-discontinued items with costs from the selected vendor are accepted. Item CountShown below the table. The sum of all quantities across all items. Provides a quick sanity check against the packing slip total. |
Buttons
Post SlipThe key action button. Posts the packing slip and creates (or updates) a Vendor Invoice. Posting is only available when the slip's status is Received: • If the slip is Pending, you are told "Slip is pending" — change the status to Received first. When posting: • If an Invoice # was provided and a matching vendor invoice exists, the slip's items are added to the existing invoice. This allows multiple packing slips to feed into a single vendor invoice. View SerialsOpens a dialog showing all serial numbers entered across all items on the slip. For items that track serial numbers, a serial entry dialog is prompted automatically when the item is scanned or the quantity changes. Use View Serials to review, edit, or add missing serial numbers before posting. Serial numbers already in stock are marked as unavailable to prevent duplicates. |
Typical Workflow
|
1. A delivery arrives with a packing slip. Create a new Slip Master. |