
Customers & Sales
Print Statements
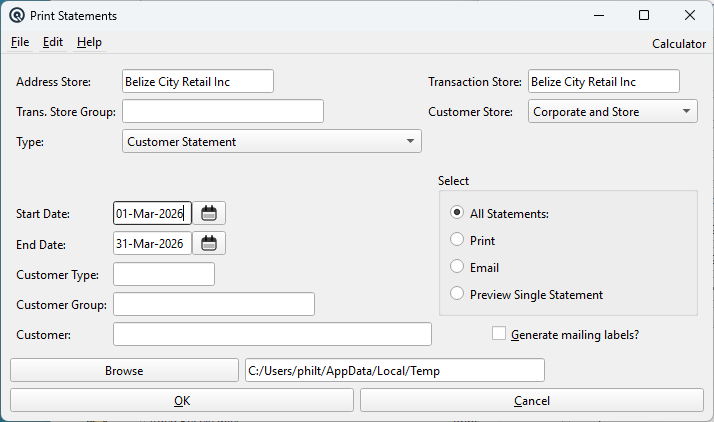
Print Statements generates customer account statements for printing, emailing as PDF attachments, or on-screen preview. Statements show opening balances and all transactions within the statement period. Supports multi-store environments with separate address and transaction stores, customer filtering, and optional mailing label generation. Access from Sales › Print Statements.
Store Settings
Address StoreThe store whose name and address appear on the printed/emailed statement header (the "from" address). Defaults to the current store. This is typically your head office or the store that sends out statements. Transaction StoreThe store from which transactions are pulled. Only transactions posted at this store are included on the statement. Defaults to the current store. Setting a Transaction Store clears the Trans. Store Group (they are mutually exclusive). Trans. Store GroupAlternative to Transaction Store. Select a store group to include transactions from all stores in the group. Setting a group clears the Transaction Store. Useful for multi-location businesses that send consolidated statements. Customer StoreControls which customers receive statements based on their store assignment:
TypeStatement template to use for printing. Populated from report XML files tagged with |
Date & Customer Filters
Start DateFirst day of the statement period. Auto-populated from the store's statement cycle (usually the first day of the current or previous statement period). Changing the Start Date auto-recalculates the End Date based on the store's statement period length. End DateLast day of the statement period. Auto-calculated from the Start Date.
Customer TypeOptional. Filter to customers of a specific account type (e.g. Retail, Wholesale). Customer GroupOptional. Filter to customers in a specific group. CustomerOptional. Select a specific customer. Required when using Preview Single Statement mode. |
Output Mode
|
The "Select" radio group determines how statements are delivered: All StatementsPrints statements for customers who do not have "Email Statements" enabled, and emails PDF statements to customers who do have it enabled. This is the default and most common choice for monthly statement runs. Prints statements only. Includes only customers who do not have "Email Statements" enabled in their Customer Master. Customers who prefer email are excluded. Emails PDF statements only. Includes only customers who do have "Email Statements" enabled. Email addresses are validated before processing — customers with invalid emails are reported in a warning dialog. Preview Single StatementOpens a single statement in the on-screen Report Viewer for review. Requires exactly one customer to be selected in the Customer field. Ignores the "Print Statements" flag — useful for reviewing any customer's statement before a batch run. |
Additional Options
Generate mailing labels?Checkbox. When checked, after printing statements the Mailing Labels dialog opens pre-loaded with the list of customers who received printed statements. Use this to print address labels for statement envelopes. BrowseOpens a directory picker to set where emailed statement PDFs are saved before sending. DirectoryThe directory where emailed statement PDFs are saved. The path is remembered between sessions. PDFs are organized into date-stamped subdirectories (YYYY-M-D format). If the date directory already exists (statements may have been previously staged), a warning is shown. |
Customer Selection Logic
|
A customer receives a statement only if all of the following are true: • The customer is active. Customers with zero balance and no activity during the period are automatically excluded — blank statements are never generated. |
Opening Balance Calculation
|
The opening balance on each statement is the sum of all |
Email Processing
|
When emailing statements: 1. A PDF is generated for each customer and saved to the Browse directory in a date-stamped subdirectory. |
Buttons
OKRuns the statement generation. Validates all fields, selects customers, and processes according to the selected output mode. Shows a print dialog (for printing) or opens the Send Email dialog (for emailing). CancelCloses the window without generating any statements. |
Validation
|
The following are validated before processing: • Address Store is required. |
Workflow
|
Monthly statement run: 1. Open Print Statements. Dates auto-fill to the last complete statement period. Preview a single customer's statement: 1. Select Preview Single Statement. |
Related Screens
| Detailed Statement | Aged Receivables | Customer Master | Service Charges |
| Quasar Accounting 7.1 • © Linux Canada Inc. • Table of Contents |